<Part 1 of 2>Table of contents
- Equipment used to take beautiful intraoral photographs
- Camera and flash settings
- Shooting method with fixed shooting magnification
- How to hold the camera when taking an intraoral image
Equipment used to take beautiful intraoral photographs
Introduction
Dr. Mitsuhiko Takata of Takata dental clinic (Kobe Japan) supervised the method of taking standardized intraoral photographs (5-sheet method) in order to introduce a technique for taking accurate and beautiful intraoral photographs more easily using equipment that is widely available on the market.
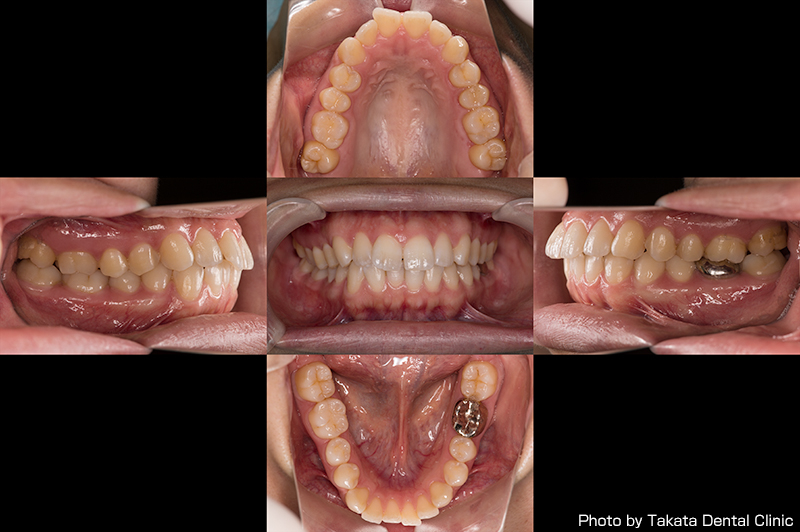
[Photo 1] Intraoral photograph by the 5-sheet method.
Front / anterior jaw (center), occlusal surface / upper jaw (upper), left side view (left), right side view (right), occlusal surface / lower jaw (lower)
Relatively inexpensive shooting equipment
The first piece of equipment needed to take intraoral photographs is a digital SLR camera.
An SLR camera may sound like an expensive piece of equipment, but the system introduced under the supervision of Dr. Takata is relatively inexpensive because it uses a popular digital SLR camera, lens, and flash, rather than a system made specifically for dentistry.
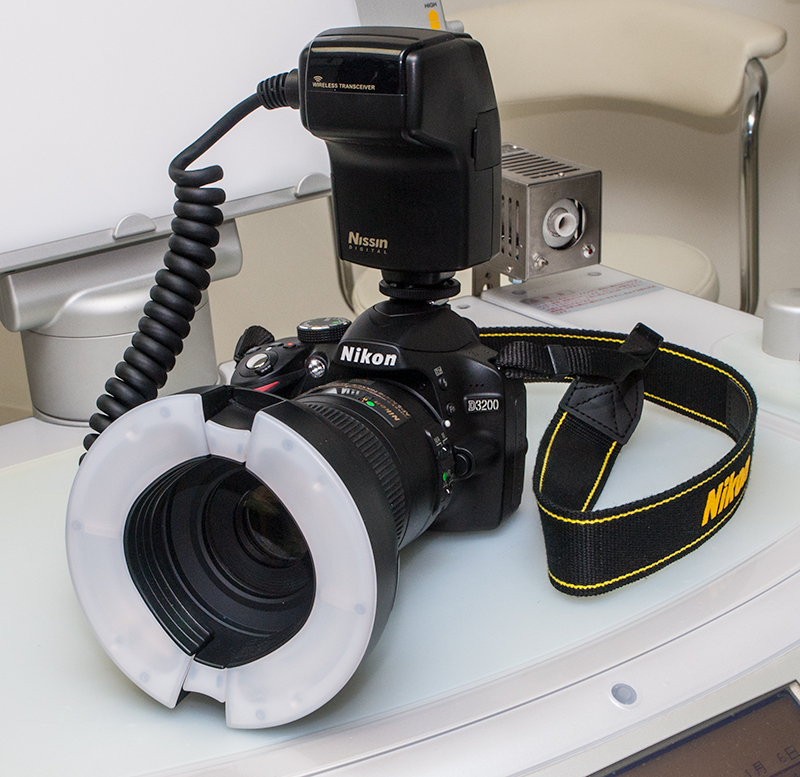
First of all, assuming that the camera body is light enough for a woman to hold in one hand and shoot with the high resolution and faithful color reproduction, Nikon D3200 is probably one of the most suitable bodies if you choose one with high resolution and linear color representation. (The latest information: Recommended cameras and lenses for dental record photos)
The next, lens is a single focal length lens for macro photography (a lens with a fixed focal length (*1). There is no zoom function). Intraoral photographs must be taken at a fixed magnification (*2) (see below), so avoid using zoom lenses with variable focal length. Here, I will use Nikon AF-S DX Micro NIKKOR 85mm f/3.5G ED VR. This lens also has an vibration reduction (VR) function, so you can shoot with relative peace of mind even when the camera is handheld.
[NOTE]
Shooting equipment recommended by Doctor Takata
Camera: Nikon D3200
Lens: Nikon AF-S DX Micro NIKKOR 85mm f/3.5G ED VR
Flash: Nissin MF18
*1 Focal length
The point at which the lens collects light and the length to the lens. The distance that the lens is in focus. In other words, the distance from the lens to the film or image sensor is called the focal length. Focal length affects the angle of view of a photo. A short focal length results in a wide angle of view, and a long focal length results in a narrow angle of view.
*2 Shooting magnification (reproduction ratio)
The ratio of the actual size of the subject to the size of the image captured on the light receiving element. When a 1 inch subject is captured at 1/2 inch size, it is called ‘1/2 times’ or ‘0.5 times’, and it is written as ‘1:2’ or ‘0.5X’.
Ring flash that can irradiate the back teeth
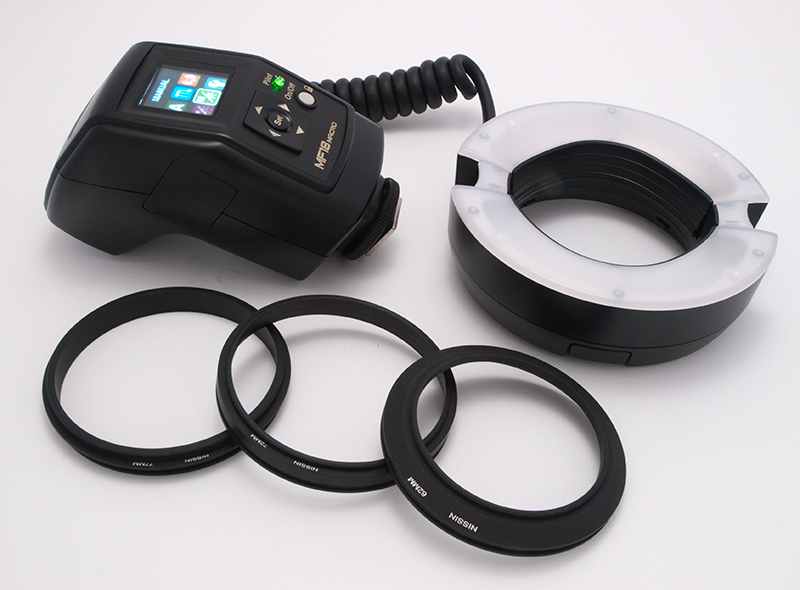
The camera body, lens, and the third shooting equipment is flash, which are lighting devices that brightly illuminate the oral cavity. Here, we use the Ring Flash Nissin MF18.
This flash
has a separate flash body and light emitting part, and since the light emitting part can be attached to the tip of the lens and used, the flash can be fired at the same position as the optical axis of the lens, illuminating every corner of the oral cavity brightly.
One of the points I recommend the Ring Flash Nissin MF18 is that the operation of the flash is very easy to understand. The operation panel on the back of the flash body is a highly visible color LCD, and the various function icons placed on the screen are easy to understand, so even first-time users will find it relatively easy to handle.
[NOTE]
The MF18 is a flash in which the flash body and the light emitting part are separated, and the light emitting part can be attached to the tip of the lens.
An adapter ring is attached to support various lens diameters (Filter attachment size).
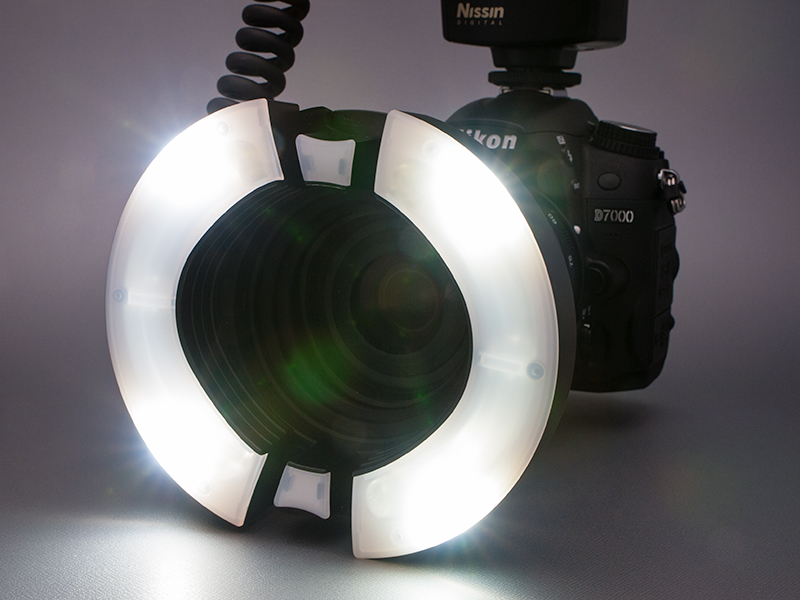
The ring-shaped light emitting part of the Ring Flash MF18 can be opened and closed to the left and right as shown in Photo 4. This allows you to change the irradiation range of the flash, which is useful when taking a facial photograph of a patient whose shooting distance is longer than that of intraoral photography.
This MF18
has a very useful function when taking an intraoral image. It is an auxiliary light (modeling light) that can always emit light at the same position as the light emitting part.
As you know, the oral cavity is dark, and the shadow of the photographer tends to make the visibility worse when shooting with the camera close, so illuminating the oral cavity with this auxiliary light makes it easier to focus. The auxiliary light automatically turns off when you press the shutter to shoot, so it does not affect the shot image.
Mirror and crafted cheek retractor

Lastly, I would like to introduce the mirror and cheek retractor, which are familiar to those who work in the dental field.
Two mirrors, one for the occlusal plane and the other for the lateral plane, are all that is needed to take most intraoral photographs. The mirrors should be as thin as possible for easy photography. For thinness, stainless steel mirrors are a better choice than glass mirrors, but the reflected image of stainless steel mirrors is a little darker than that of glass mirrors.
Here, we prioritize thinness and use stainless steel mirror. When actually using the mirror for photography, warm it up immediately before inserting it into the mouth so that the mirror surface does not fog up.
Next, the cheek retractor needs to be modified in advance. If you use the commercially available retractor, one of the retractor may interfere with the insertion of the mirror, so cut off a part of the retractor and polish it as shown in Photo 5. When actually using the retractor, it is also important to spray water on the part of the retractor that touches the lips to make it slippery.
[NOTE]
Prepare mirrors as thin as possible for the occlusal surface and for the lateral side. Cut off a portion of the cheek retractor so that it does not interfere with photography, and polish the cut surface.