Camera and flash settings
Once you have all the equipment you need for shooting, make various settings for the camera body, lens, and flash.
Camera settings
![[Photo 6] Camera settings](https://www.nissin-japan.com/wp/wp-content/uploads/2021/03/ndmp101006.jpg)
Use the mode dial (Photo 6) on the camera body to select the manual mode “M“. In this mode, you can manually set the shutter speed (*3) and aperture value (*4). Then set the shutter speed to “1/200” seconds and the aperture value to “F22“.
With a shutter speed of 1/200 second, it is unlikely that subject blur or camera shake will occur during intraoral photography. Also, if you set the aperture value to F22 or higher, the range that makes it easier to focus will be wider in the front and back. At the end of the camera settings, set the ISO sensitivity (*5) to “100”.
[Setting method on D3200]
Set the mode dial [1] of the camera body to the manual mode “M“, the shutter speed and aperture value [2] to “1/200” and “F22“, and the ISO sensitivity [3] to “100“.
Focus mode setting
For standard photographs in the oral cavity, it is necessary to arbitrarily fix the shooting magnification in order to clarify the magnification of the image.
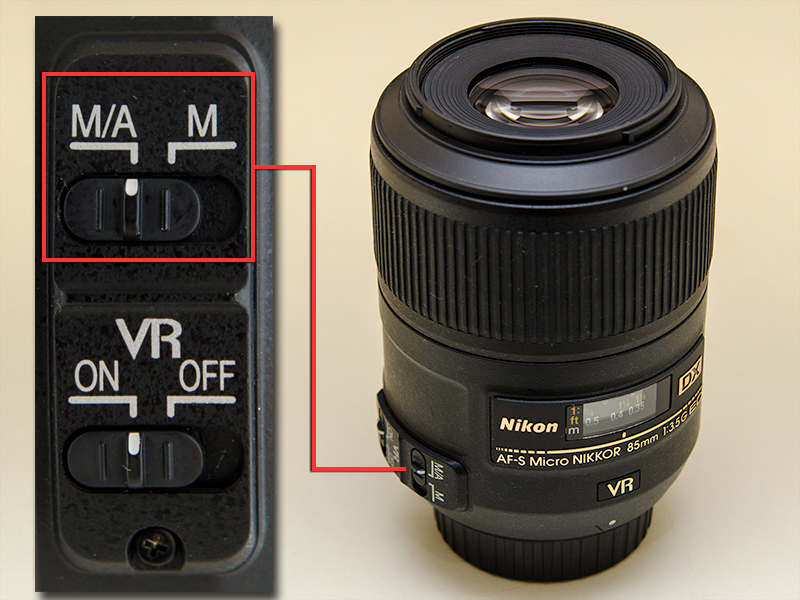
Therefore, it is better to set the focus to manual (M) at the correct magnification, but if you want more convenience, you can use automatic (M/A). (The reason will be described later) This time, in order to shoot more easily, we will shoot with “M/A“.
For focus (focusing), select [M] for fixed magnification, or [M/A] for auto focus (autofocus).
Ring flash settings
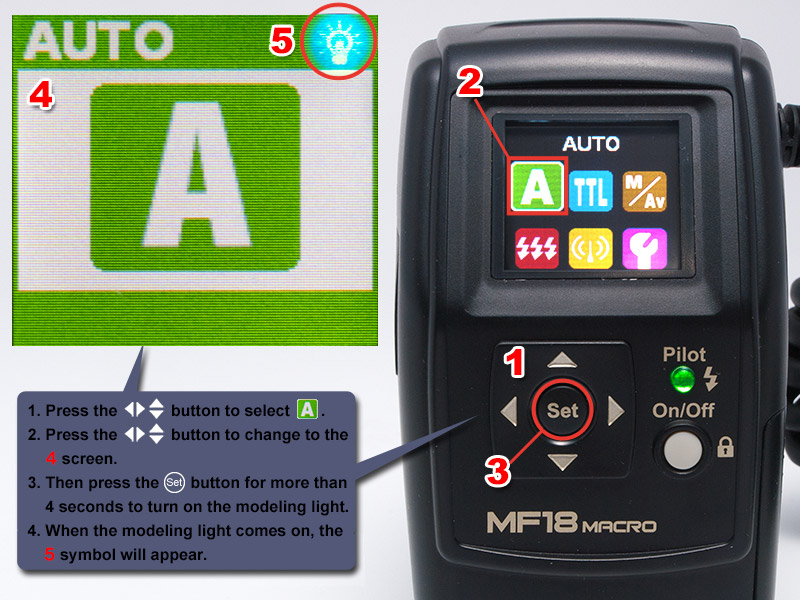
The Ring Flash MF18 setting must be in “A” (Auto) mode. (Photo 8)
-
- Select the ”A” icon with the triangle symbol key.
- Press the “Set” button, and the screen will change to a green “A”.
- Press the “Set” button for more than 4 seconds to turn on the modeling light and display the icon.
When you use “A” mode, the amount of light emitted with the optimum brightness is automatically determined according to the shutter speed and aperture value.
The auxiliary light (modeling light) settings introduced in Photo 4 are also operated on the screen in Photo 8.
*3 Shutter speed
The shutter is a device inside the camera that adjusts the time to apply the light to the imagesensor. It is normally closed, but when you press the shutter button, the shutter opens for a preset time, Closes over time. This time is called the shutter speed and is written as “1/30” or “1/125”. On the camera body, “1/” is omitted for display. Also called shutter speed.
*4 Aperture value (F value)
The “aperture” is generally located inside the lens and is designed to open and close in a circle by combining several plates. Change the size of the aperture to adjust the amount of light that hits the photosensitive part of film, CCD, CMOS, etc. “Aperture” is represented by the numerical value “F value”.
The smaller the numerical value, the larger the aperture diameter, and the larger the numerical value, the smaller the aperture diameter. The larger the aperture of the aperture, the more light hits the photosensitive area, but the range of focus becomes narrower back and forth.
On the other hand, if the aperture is smaller, the amount of light will be smaller, but the range of focus will be larger in the front and back. On the other hand, if the aperture is smaller, the amount of light will be smaller, but the range of focus will be larger in the front and back.
*5 ISO sensitivity
Originally, it is a standard for photographic film and is a numerical value that indicates the sensitivity of the film to light, but in digital cameras it indicates the sensitivity of imagesensor such as CCD and CMOS. The higher the value, the higher the sensitivity, and you can shoot at a high shutter speed even in dark places.