

Introducing the New Machine Gun Strobe "MG10" (New Features)
Thanks to your support, our new machine gun strobe, the "MG10," has been well-received.
Today, we will finally introduce the various functions that can only be realized when combining the MG10 with the Air10s.
There are three main characteristic features:
・Advanced Group
・Open Mode
・Remote Shutter Function
So, today we will introduce each of these in detail!
【Advanced Group】In addition to the conventional A/B/C groups, the MG10 has added a D group; however, when you turn the mode dial further, a "●A/●B/●C/●D" display appears.
These items marked with a "●" correspond to the "Advanced Group."
With the Air10s updated to the firmware that supports the MG10, it is now possible to manage a total of 8 groups: the 4 conventional groups (referred to as "Normal Groups" here for convenience) of A–D, plus the 4 Advanced Groups of ●A–●D.
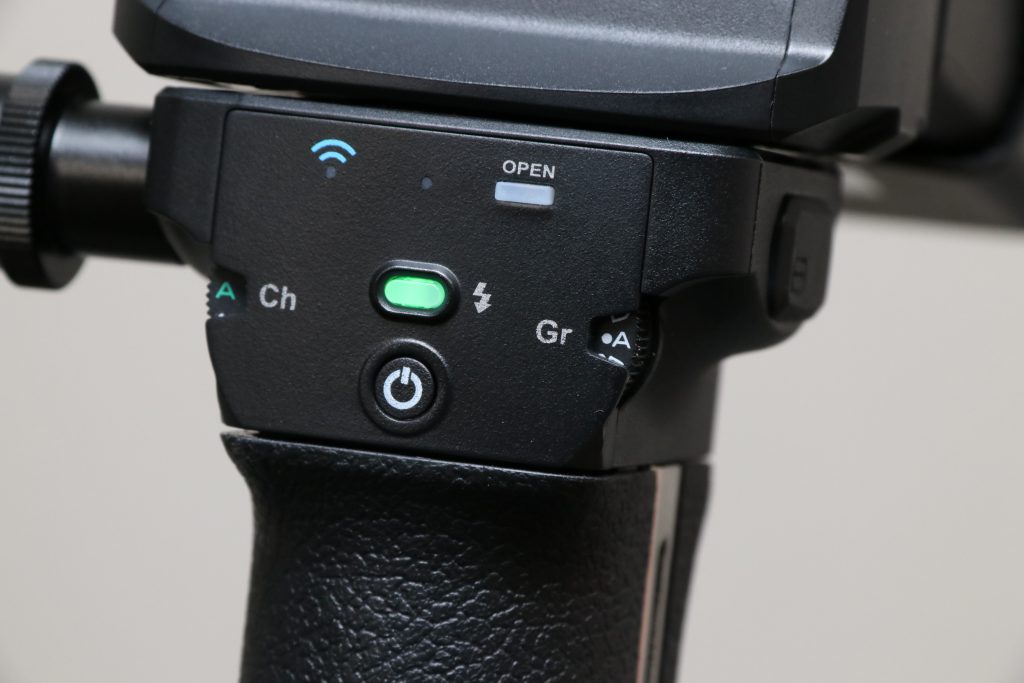 The group setting dial on the right is set to "●A," so this state is "Advanced Group A."
Please note that this Advanced Group is only supported by the MG10, but a unique feature of this group is that "TTL and Manual can be used simultaneously."
For example, you can set ●A to Manual for background or top lighting, and ●B to TTL for front lighting—combinations like this are possible.
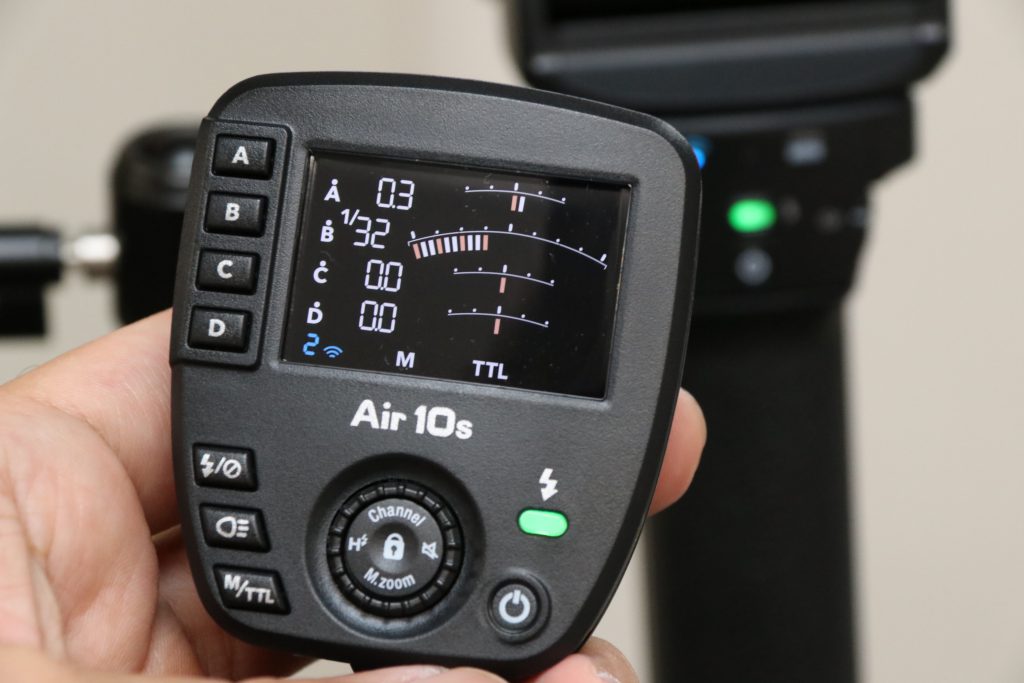 To enter the Advanced Group on the Air10s, long-press the "Modeling Light Button," which is the second from the bottom on the left. The same operation is used to return to the original Normal Group.
The photo above shows an example within the Advanced Group where A is set to TTL with +0.3 EV, and B is set to Manual at 1/32 power. When the Air10s is in Advanced Group mode, a "●" mark appears above the group letter on the far left, and both M and TTL flash modes light up simultaneously.
While the Advanced Group itself is exclusive to the MG10, you can use a total of 8 groups simultaneously by including the Normal Groups, despite the slight inconvenience of switching screens. In that case, you can individually switch the flash mode to TTL or Manual for each Normal and Advanced Group, allowing for simultaneous use.
You could, for instance, assign i60A or Di700A units to Normal Groups A–C to use them in TTL mode from the front, while preparing two MG10 units assigned to the Advanced Groups—using one for side TTL lighting and the other for manual top lighting—enabling a variety of combinations previously unimaginable.
【Open Mode】In Nissin's proprietary radio wireless system "NAS," communication only occurs between paired units regardless of channel settings, which makes it resistant to interference or accidental firing due to overlapping channels. However, if you wanted to use two cameras, each equipped with a commander (Air10s or Air1), interchangeably, it was very inconvenient because you had to either re-pair everything or keep one commander specifically for manual use.
The Open Mode equipped in the MG10 is a mode where "as long as the channel matches, settings and firing are possible without needing to pair," just like wireless systems from other manufacturers. This makes it easy to use the full functionality of the MG10 when shooting with multiple cameras, at photo shoots, seminars, or workshops.
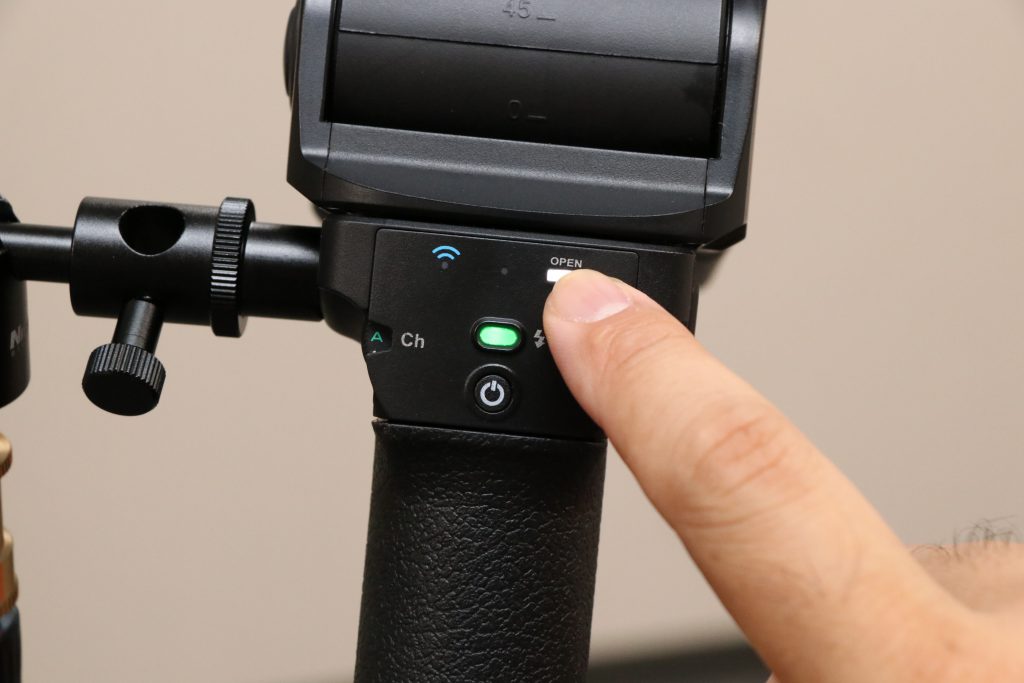 To use Open Mode, first press the button labeled "OPEN" on the back of the MG10. When you enter OPEN mode, the button will light up white.
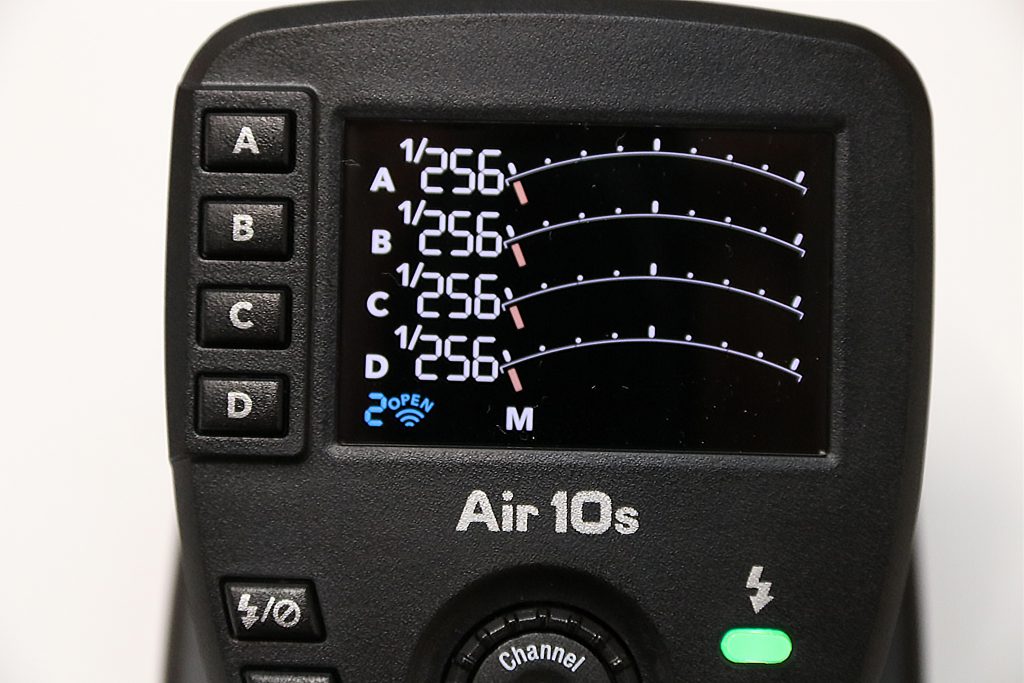 On the Air10s, long-press the "M/TTL" button (the bottom button on the left), and if "OPEN" appears above the radio mark next to the channel display on the panel, you are ready.
In this Open Mode, it will accept signals from all nearby Air10s units, regardless of whether they are paired or not.
The flash output is linked to the value set on each respective Air10s, so even if you need to change light settings for each camera due to differences in ISO sensitivity or lens aperture, the photographer simply has to press the shutter while the Air10s is attached. You don't need to swap commanders or adjust light settings each time, and it fully supports versatile shooting modes like TTL Auto and High-Speed Sync, all of which can be used simultaneously.
Furthermore, because Open Mode and Advanced Mode can be used at the same time, you can even use a mix of TTL and Manual flash.
【Remote Shutter Function】There is a shutter button on the front of the MG10, opposite the control panel, which allows you to release the camera's remote shutter from the MG10 side.
This allows you to build an entirely new shooting style where you mount the camera on a tripod and hold the strobe in your hand to handle the lighting.
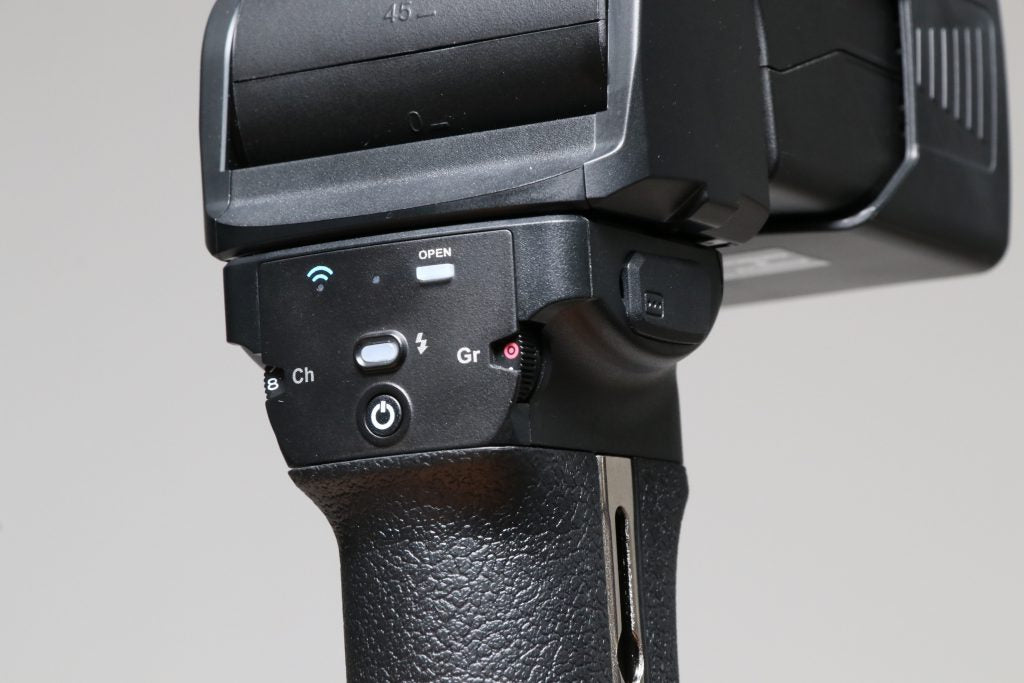 When using the Remote Shutter function, set the group dial on the MG10 to the "red circle mark."
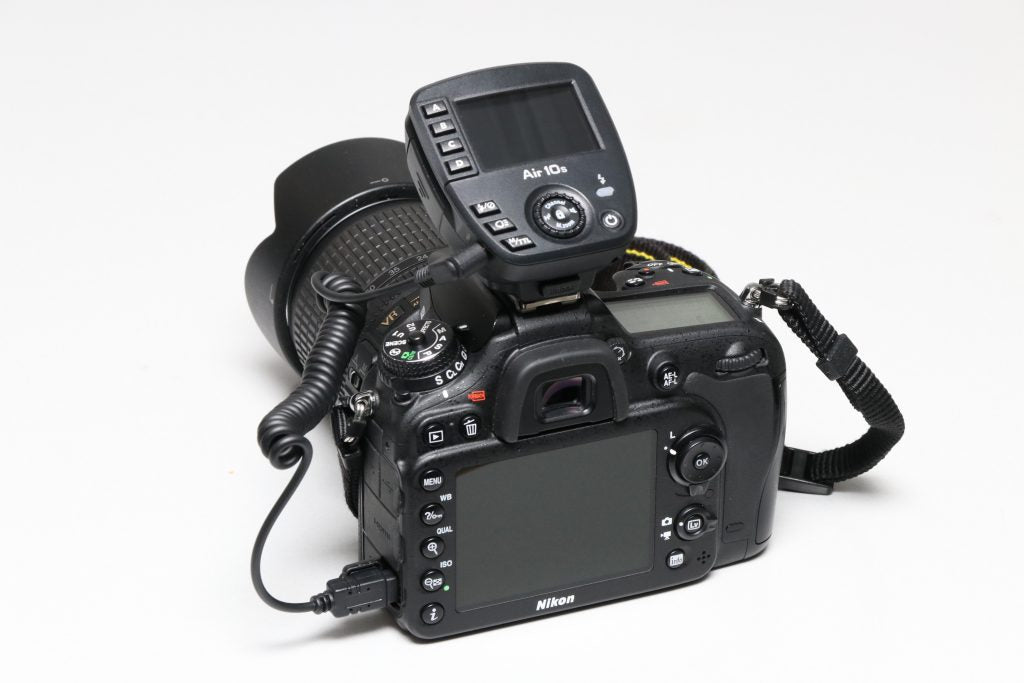 Connect your camera using the remote release cable included with the Air10s.
For Canon: N3 terminal (3-pin) such as the 1D/5D series, and E3 terminal (2.5mm mini-jack) such as the Kiss series.
For Nikon: Round 10-pin terminal such as the D5/D850, and MC-DC2 type such as the D7000 series.
For Sony: USB microB/Multi terminal for E-mount, and square 3-pin terminal for A-mount.
For Fujifilm: USB miniB type and USB microB type.
Two types of cables are included for each, so please choose and connect the one that matches your camera.
Note that the Remote Shutter function cannot be used with older models that have different terminals or cameras that do not support external remote releases (such as the Nikon D3000 series).
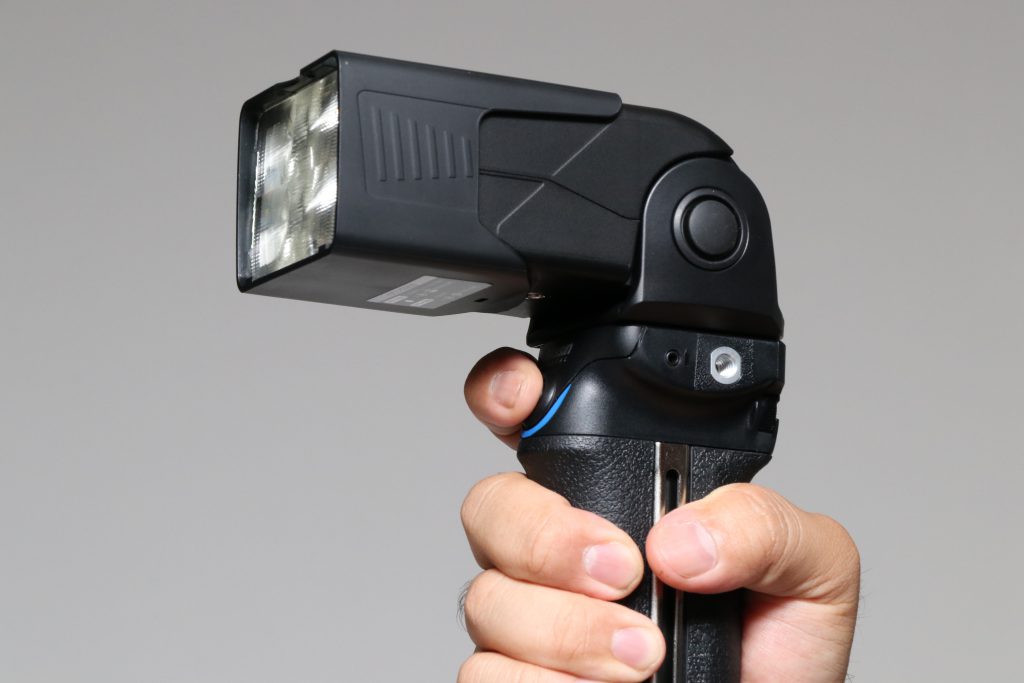 Once you are ready, all you have to do is press the shutter button on the MG10.
Since half-pressing for AF operation and AE lock works as expected, you can use it with the exact same feel as the camera's own shutter button.
Updated 2018.9.6
The flash group during remote shutter use is automatically fixed to "Advanced Group A (●A)."
For switching flash modes and adjusting light output, please refer to the Advanced Group section above.
Multi-light photography combined with other strobes set to other groups is also possible.
What did you think? We hope you have felt the appeal of features not found in other companies' products—features that might inspire you with thoughts like, "I could use this in that scene I struggled with until now," or "It would be interesting to shoot like this using this function."
To reiterate, these three functions introduced today are only realized when the MG10 and Air10s are used together. Since the MG10 is compliant with the NAS system, it can of course be operated with the conventional Air1, but to make 100% use of these features, please be sure to use it with the Air10s.
The initial production limited "MG10 + Air10s Kit (for Canon, Nikon, Sony)" has been available for pre-sale only at our authorized dealers nationwide since August 24th.
Starting in late September, we will also begin selling individual units through online stores (Nissin Digital Direct shops), so please consider adding one to your gear.
 MG10 Product Information https://www.nissin-japan.com/product/mg10/
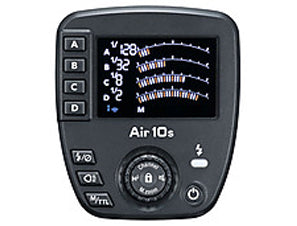 Air10s Product Information https://www.nissin-japan.com/product/air10s/List of Nissin Retailers https://www.nissin-japan.com/direct/
Today, we will finally introduce the various functions that can only be realized when combining the MG10 with the Air10s.
There are three main characteristic features:
・Advanced Group
・Open Mode
・Remote Shutter Function
So, today we will introduce each of these in detail!
【Advanced Group】In addition to the conventional A/B/C groups, the MG10 has added a D group; however, when you turn the mode dial further, a "●A/●B/●C/●D" display appears.
These items marked with a "●" correspond to the "Advanced Group."
With the Air10s updated to the firmware that supports the MG10, it is now possible to manage a total of 8 groups: the 4 conventional groups (referred to as "Normal Groups" here for convenience) of A–D, plus the 4 Advanced Groups of ●A–●D.
The group setting dial on the right is set to "●A," so this state is "Advanced Group A." Please note that this Advanced Group is only supported by the MG10, but a unique feature of this group is that "TTL and Manual can be used simultaneously."
For example, you can set ●A to Manual for background or top lighting, and ●B to TTL for front lighting—combinations like this are possible.
To enter the Advanced Group on the Air10s, long-press the "Modeling Light Button," which is the second from the bottom on the left. The same operation is used to return to the original Normal Group. The photo above shows an example within the Advanced Group where A is set to TTL with +0.3 EV, and B is set to Manual at 1/32 power. When the Air10s is in Advanced Group mode, a "●" mark appears above the group letter on the far left, and both M and TTL flash modes light up simultaneously.
While the Advanced Group itself is exclusive to the MG10, you can use a total of 8 groups simultaneously by including the Normal Groups, despite the slight inconvenience of switching screens. In that case, you can individually switch the flash mode to TTL or Manual for each Normal and Advanced Group, allowing for simultaneous use.
You could, for instance, assign i60A or Di700A units to Normal Groups A–C to use them in TTL mode from the front, while preparing two MG10 units assigned to the Advanced Groups—using one for side TTL lighting and the other for manual top lighting—enabling a variety of combinations previously unimaginable.
【Open Mode】In Nissin's proprietary radio wireless system "NAS," communication only occurs between paired units regardless of channel settings, which makes it resistant to interference or accidental firing due to overlapping channels. However, if you wanted to use two cameras, each equipped with a commander (Air10s or Air1), interchangeably, it was very inconvenient because you had to either re-pair everything or keep one commander specifically for manual use.
The Open Mode equipped in the MG10 is a mode where "as long as the channel matches, settings and firing are possible without needing to pair," just like wireless systems from other manufacturers. This makes it easy to use the full functionality of the MG10 when shooting with multiple cameras, at photo shoots, seminars, or workshops.
To use Open Mode, first press the button labeled "OPEN" on the back of the MG10. When you enter OPEN mode, the button will light up white. On the Air10s, long-press the "M/TTL" button (the bottom button on the left), and if "OPEN" appears above the radio mark next to the channel display on the panel, you are ready. In this Open Mode, it will accept signals from all nearby Air10s units, regardless of whether they are paired or not.
The flash output is linked to the value set on each respective Air10s, so even if you need to change light settings for each camera due to differences in ISO sensitivity or lens aperture, the photographer simply has to press the shutter while the Air10s is attached. You don't need to swap commanders or adjust light settings each time, and it fully supports versatile shooting modes like TTL Auto and High-Speed Sync, all of which can be used simultaneously.
Furthermore, because Open Mode and Advanced Mode can be used at the same time, you can even use a mix of TTL and Manual flash.
【Remote Shutter Function】There is a shutter button on the front of the MG10, opposite the control panel, which allows you to release the camera's remote shutter from the MG10 side.
This allows you to build an entirely new shooting style where you mount the camera on a tripod and hold the strobe in your hand to handle the lighting.
When using the Remote Shutter function, set the group dial on the MG10 to the "red circle mark." Connect your camera using the remote release cable included with the Air10s. For Canon: N3 terminal (3-pin) such as the 1D/5D series, and E3 terminal (2.5mm mini-jack) such as the Kiss series.
For Nikon: Round 10-pin terminal such as the D5/D850, and MC-DC2 type such as the D7000 series.
For Sony: USB microB/Multi terminal for E-mount, and square 3-pin terminal for A-mount.
For Fujifilm: USB miniB type and USB microB type.
Two types of cables are included for each, so please choose and connect the one that matches your camera.
Note that the Remote Shutter function cannot be used with older models that have different terminals or cameras that do not support external remote releases (such as the Nikon D3000 series).
Once you are ready, all you have to do is press the shutter button on the MG10. Since half-pressing for AF operation and AE lock works as expected, you can use it with the exact same feel as the camera's own shutter button.
Updated 2018.9.6
The flash group during remote shutter use is automatically fixed to "Advanced Group A (●A)."
For switching flash modes and adjusting light output, please refer to the Advanced Group section above.
Multi-light photography combined with other strobes set to other groups is also possible.
What did you think? We hope you have felt the appeal of features not found in other companies' products—features that might inspire you with thoughts like, "I could use this in that scene I struggled with until now," or "It would be interesting to shoot like this using this function."
To reiterate, these three functions introduced today are only realized when the MG10 and Air10s are used together. Since the MG10 is compliant with the NAS system, it can of course be operated with the conventional Air1, but to make 100% use of these features, please be sure to use it with the Air10s.
The initial production limited "MG10 + Air10s Kit (for Canon, Nikon, Sony)" has been available for pre-sale only at our authorized dealers nationwide since August 24th.
Starting in late September, we will also begin selling individual units through online stores (Nissin Digital Direct shops), so please consider adding one to your gear.
MG10 Product Information https://www.nissin-japan.com/product/mg10/Air10s Product Information https://www.nissin-japan.com/product/air10s/List of Nissin Retailers https://www.nissin-japan.com/direct/